Use Power Query to Calculate Distance
Distance calculations! Over the past couple of years, I have had several clients who are using PowerPivot who want to measure the distance between two points on a map: Client to distribution center or building to building.
For just a few calculations, this is very straight-forward using plain old Excel. It has all the needed trig functions to calculate the distance in miles between two points using Longitude and Latitude where they are expressed in decimal form.
The first step is expressing each Latitude/Longitude of both of the coordinates in radians:
lat1 = (lat1Decimal / 180) * PI (3.14159265359)
lon1 = (lon1Decimal / 180) * PI (3.14159265359) – repeat for 2
Finally, use this formula in Excel to derive the distance in Miles. If you prefer km, then change the ending constant to 6371.
You can download a file which has the formulas: The table contains the coordinates, and the radian calculations are in columns H:K, and the final distance calculation is in column M.
The problem we encountered was when we wanted to calculate a million records which was too many formulas for Excel to handle gracefully.
We would have liked to use PowerPivot to solve this issue, but alas, there isn’t a Sin() or Cos() function in DAX (the PowerPivot formula language), so this was not possible.
Power Query to the rescue!!
Power Query is built on a language called “M” – kind of sounds like something out of a 007 movie, huh?
Let’s create the calculation!
I downloaded the From/To coordinates into Excel and formatted the area as a Range (Home Ribbon > Format as Table > select any format)
On the Power Query ribbon, you will see that there are many different data sources we can use to get data. In this case, we are going to select From Table.
This will bring up the Power Query Window. Since I named the table “Distance” in Excel, the Name Property in Query Settings has already named the query “Distance”.
The formula bar displays the syntax for sourcing data from an Excel data Range with a range named “Distance”
=Excel.CurrentWorkbook(){[Name=”Distance”]}[Content]
Just like in Excel, we could put the entire formula, including the calculation of the radians, in one gigantic formula, but it is much more difficult to read. So we will do it like Excel, and perform it in steps.
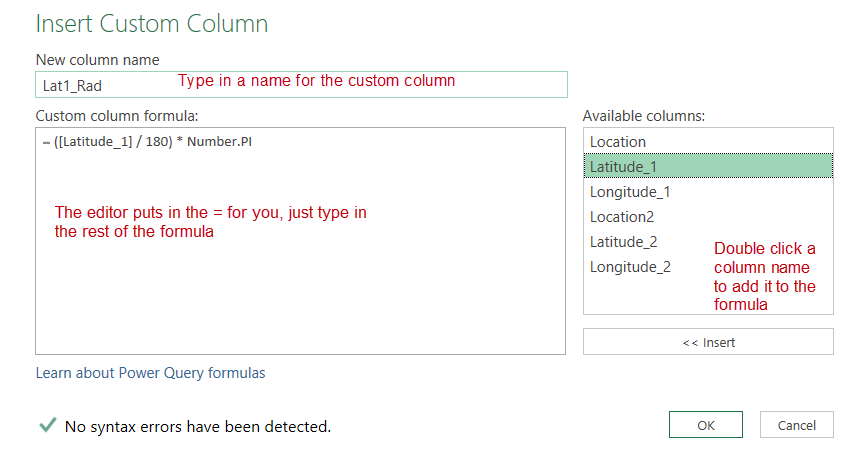
The next step is to add a column to calculate each of the 4 coordinates to Radians. To do this, you will select Insert Custom Column from the Insert Ribbon.
Enter the formula in the formula bar:
Lat1_Rad = ([Latitude_1] / 180) * Number.PI
Click OK to close the editor. Repeat this process 3 more times for the remaining coordinates:
Lon1_Rad = ([Longitude_1] / 180) * Number.PI
Lat2_Rad = ([Latitude_2] / 180) * Number.PI
Lon2_Rad = ([Longitude_2] / 180) * Number.PI
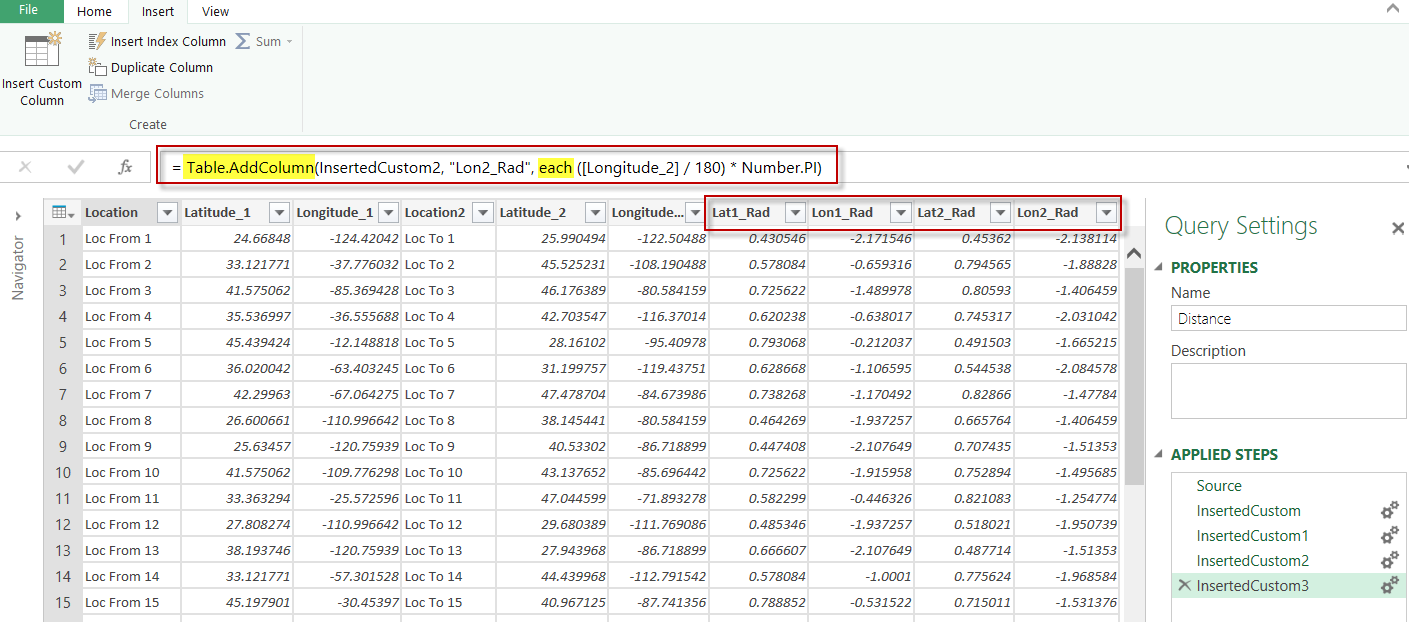
After adding all 4, your query editor should look like this. You can see the column names that you entered, and on the right Applied Steps pane, there is an entry for each action we have taken. Currently the last item is highlighted, and the corresponding formula is visible in the formula bar.
PQ has performed an AddColum function on the Table, and for each item, has performed the requisite calculation. Scroll thru each step to see the syntax for each. Also, you will note, as you select each item, it displays what the table looks like up to that point. This is very evident when you click on Source, as the four calculated columns disappear. Click on InsertedColumn3, and they re-appear. This is a great tool for debugging more complex M scripts.
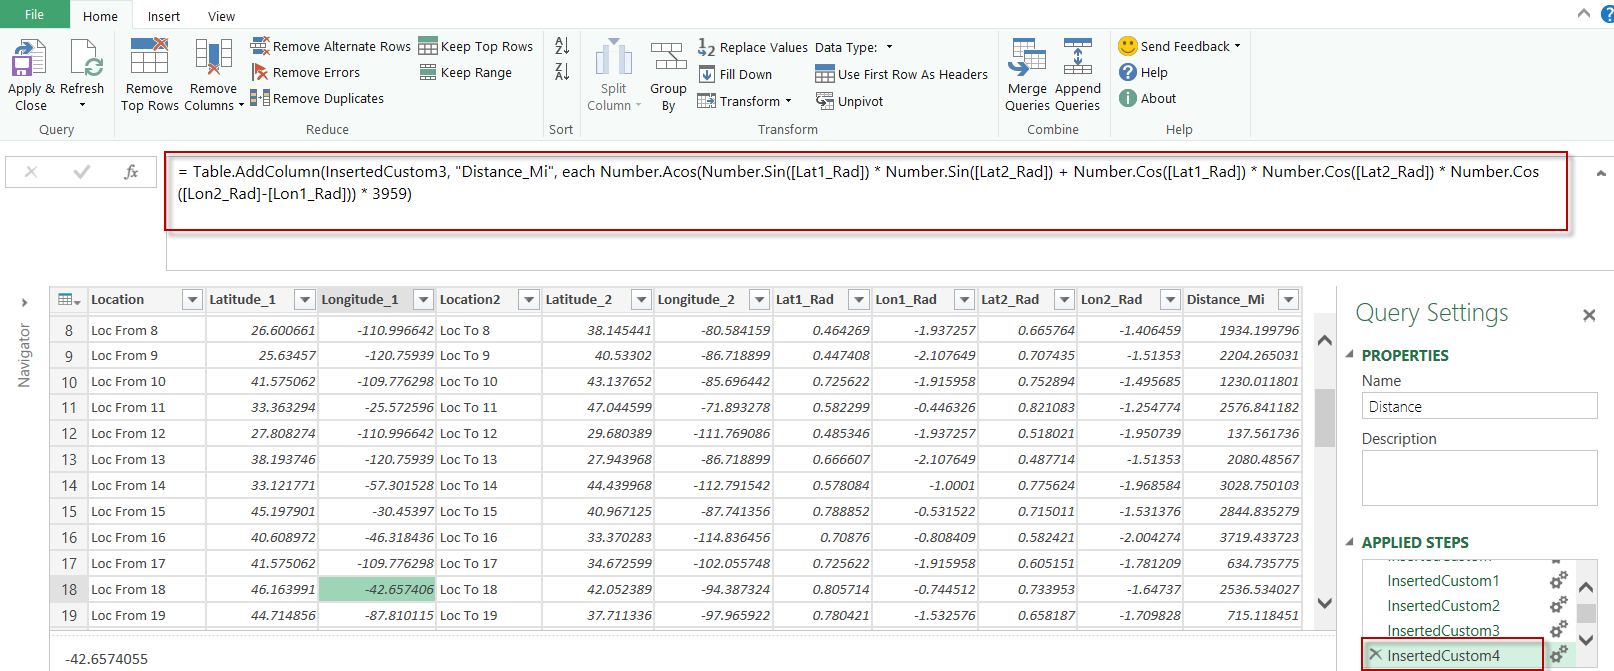
Finally, we add the column for distance as “Distance_Mi”. Be sure to follow the capitalization structure from the Power Query reference EXACTLY as it is currently VERY case sensitive. I hope they ease this a bit in future releases, as it messes with my brain a bit to have to remember when to cap and when to ensure functions are lower case.
Distance_Mi = Number.Acos(Number.Sin([Lat1_Rad]) * Number.Sin([Lat2_Rad]) + Number.Cos([Lat1_Rad]) * Number.Cos([Lat2_Rad]) * Number.Cos([Lon2_Rad]-[Lon1_Rad])) * 3959
Now, in our final model, would probably want to keep the Latitude and Longitude columns in order to play with the cool mapping functions in Power Map and Power View (which we will do in a subsequent post), but you no longer need the “helper calculations” for the radians.
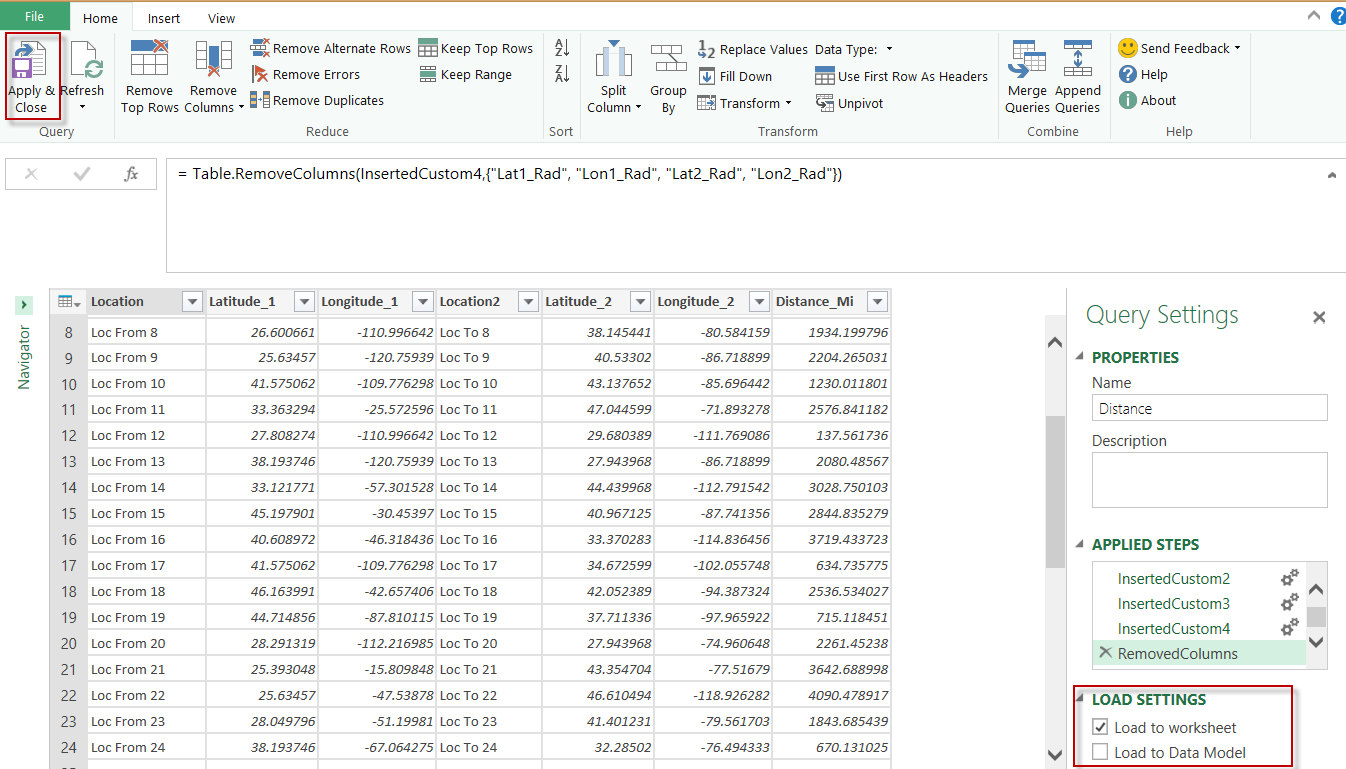
 Highlight the four radian columns, and from the Home Ribbon, select the dropdown on Remove Columns and select Remove Columns. Note the other choice here is to Remove OTHER Columns which comes in really handy when you have a list with a ton of columns but you only need a couple of them.
Cool, huh? Since the previous steps are still in the list, the calculations for the removed columns are still in memory, so the distance calculation still works!!
On the bottom right, you have selections for where to load the data. If you don’t need it in Excel, you can go directly to the PowerPivot model by selecting Load to Data Model. For our purposes, we are just going to Load to Worksheet, so ensure that is clicked and select Apply and Close from the Home ribbon.
Note: In Excel 2010 the only selection you can make is Load to Worksheet. The Load to Data Model is available in Excel 2013 and O365.
 You now have a finished distance calculation! Test it by comparing the Excel formulas from the original table!
In our next post, we are going behind the scenes of this calculation and start to look at some Advanced Editing functions within “M”.


